Keep Employees Informed about COVID-19 with a Chatbot: Part 2

A chatbot can be a simple and easy way to answer your employees' questions—and we know they may have a lot right now. In this second post of our two part series, learn advanced steps for getting a chatbot up and running quickly with NativeChat.
With Progress NativeChat, our AI-powered chatbot, you don’t need to be a developer to create a chatbot capable of answering all questions your employees might have.
This article is a follow up article for Keep Employees Informed About COVID-19 with a Chatbot: Part 1. In that post, we built the basics of a chatbot that could answer a number of questions from employees related to COVID-19. In this post, we'll take the chatbot to the next level by learning to manage Q&A categories and about how displaying lists of questions work.
It is important that you go through the first article before you continue with Part 2. Once you've reviewed that, let's proceed.
Overview
The COVID-19 Chatbot we began building in Part 1 comes with an interesting feature, which allows the users to type:
- Covid Questions
- Travel Questions
- Finance Questions
- Meetings Questions
- WFH Questions
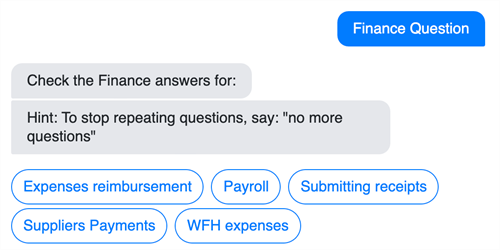
Each expression will result in displaying a set of available interactive questions for that category. For example:
The Purpose
The purpose of this article is to:
- Explain where the text for each button in a list of questions comes from
- Teach you how to add remove an unwanted Q&A category
- Teach you how to add a new Q&A category
- Teach you how to add conversation helpers, to display a list of questions in that category
List of Questions Explanation
When you say, "I have a finance question," the chatbot will respond with a list of buttons with for each available finance question.
You are probably wondering how the chatbot knows what text to display for each item.
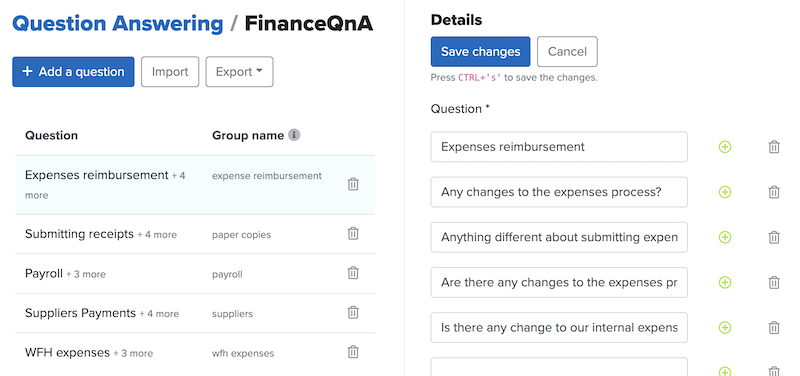
If you open the FinanceQnA category, you will see a list of
Q&As.
The first question for each Q&A is the text used to display the available questions to the
user.
Removing a Q&A Category
You may choose not to use one of the Q&A categories provided by the COVID-19 Chatbot.
If this is the case for you, you can do that in the following simple steps:
Step 1 — remove the unwanted category
First, you need to remove the unwanted category and all its Q&As.
Go to the Question Answering page.
Then press the trash can next to the category that you want to remove.
Step 2 — remove the conversation trigger

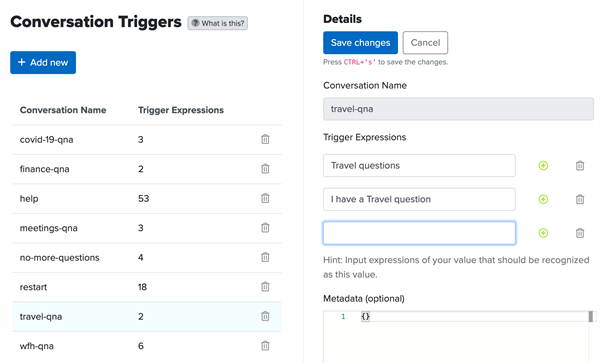
Here, you need to remove the Conversatoin Trigger that shows a list of available questions for the category that you are removing.
Note: Conversation Trigger is a set of expressions that starts a conversation.
For example travel-qna shows a list of travel questions, when you say something like:
- Travel questions
- I have a travel question
Locate the conversation trigger that is no longer needed, and delete it by clicking the trash icon next to it.
Step 3 — Test
You can try to ask questions that belonged to the removed category.
Additionally, you could ask to show a list of questions for that category.
In both cases, the chatbot should respond with, "Ask me anything" and a hint.
Adding a New Question and Answers Category
If you want to add more questions and answers, but you feel like they don't fit any of the categories provided, you can add a new category.
For example let's add a category for general questions.
Step 1 — Create a new category
Navigate to the Question Answering page, and press the + Add a category button.
Set the category name to GeneralQnA. Like this:
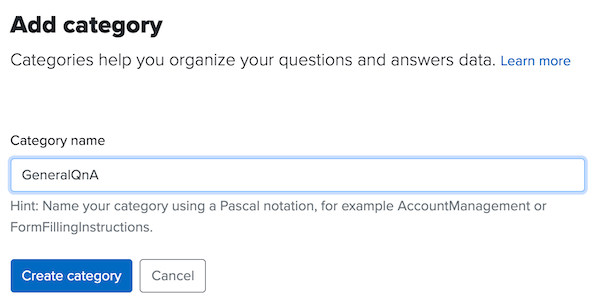
Press the Create category button.
Note: The QnA at the end it not required, however, it is nice to have consistent naming that makes it clear what you are looking at. For any new category that you create, it is best to use this format: NameQnA
Step 2 — Add your own Q&As
Now you just need to add your own questions to the general category.
Let's add one to answer questions about plants in the office.
Press the + Add a question button.
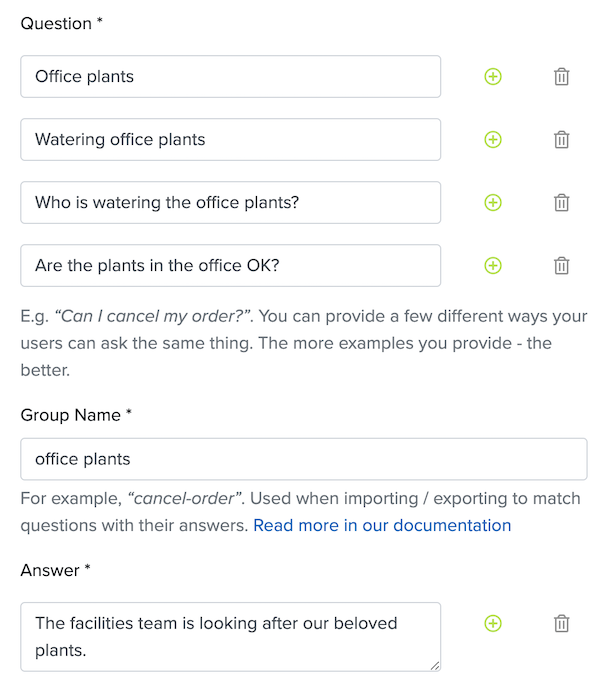
Add these questions:
- Office plants
- Watering office plants
- Who is watering the office plants?
- Are the plants in the office OK?
Set category name:
- Office plants
Answer:
- The facilities team is looking after our beloved plants.
The new Q&A should look like this:
Finally, save the changes by pressing the Save changes
button.
Step 3 — test the new question
Now, you can test the new Q&A by saying:
- Is anyone watering the plants?
Your chatbot should respond with:

Bonus—Display a List of Questions for the New Category
When you add a new category for Q&As, you will notice that when you ask "General Questions," the chatbot doesn't give you a list of available questions for that category.
This is because we have to instruct the chatbot how to do that and what to display.
This section is a bit more advanced. However, if you carefully follow the steps below, you should be fine to do it. 😇
Add Conversation Code
First, we need to add the code for a conversation that will display a list of available questions.
Don't worry, you will be given the code you need, and you will just need to make a few tiny modifications.
Note: If you get lost at any point of this section, at the end of this set of instructions, there is a video-recording showing how to complete this task.
Step 1 — go to the Cognitive Flow page
Click on the Cognitive Flow tab, which will take you to the Cognitive Flow page.
Note: Cognitive Flow is how we tell our chatbot how to handle various conversations.
Step 2 — Find the last conversation (wfh-qna)
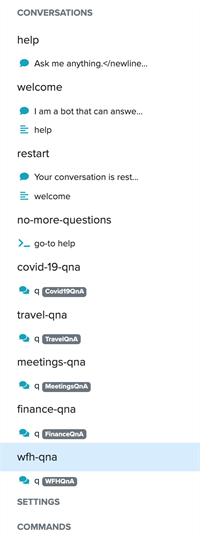
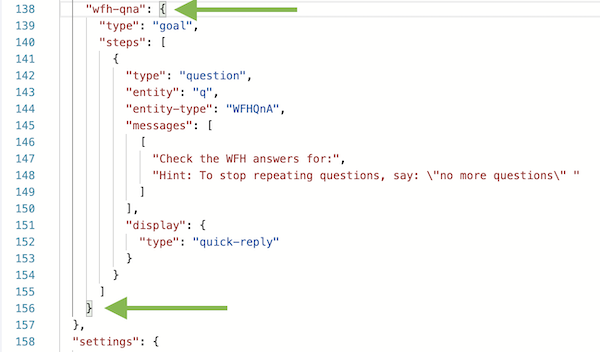
On the left hand side, there is a panel that lists all conversations in this chatbot project. Find the last one before Settings—it should be wfh-qna—and click on it.
This will take you to wfh-qna conversation code.
Here you should notice the two higlighted curly brackets { } .
Step 3 — Add a new conversation code
Click on the right hand side of the highlighted closing curly bracket (should be at line 156).
Then copy and paste the following code in there.
,"name-qna": {
  "type": "goal",
  "steps": [
    {
      "type": "question",
      "entity": "q",
      "entity-type": "NameQnA",
      "messages": [
        [
          "Check the Name answers for:",
          "Hint: To stop repeating questions, say: \"no more questions\" "
        ]
      ],
      "display": {
        "type": "quick-reply"
      }
    }
  ]
}
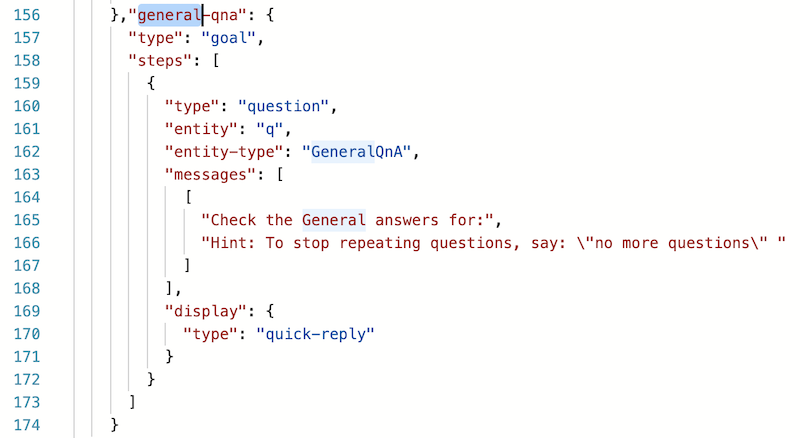
Next, we need to change the three mentions of the word name to the name of the category you want to add. In the case of this example, we are replacing name with general, like this:
It is worth explaining each of the items that you had to update:
"general-qna"— is the name of this conversation. This is used when you need to add a Conversation Trigger for this Conversation. Take note of it, as we will need it in the next step."entity-type": "GeneralQnA"— tells the chatbot where to get all the Q&A questions to display to the user. It is important to know that this has to match exactly the name you gave to your Q&A category (in the Question Answering page)."Check the General answers for:"— provides the chatbot with a text to display to the user, so feel free to adjust it to your needs.
Step 4 — Save
Press the save button, and we should be good to go.
Video Recap
Here is a video of how to complete this whole task:
Add Conversation Trigger
The final piece of the puzzle 🧩 is to tell the chatbot when to trigger our new general-qna conversation.
This is done from the Conversation Triggers page.
Step 1 — Go to Conversation Triggers page
Click on the Training tab and then click on Conversation Triggers.
Step 2 — Add a new conversation trigger
Click on the + Add new button.
Then set the Conversation Name to:
- general-qna
Note: It is important that the conversation name in here matches exactly to the name you provide in the Cognitive Flow page.
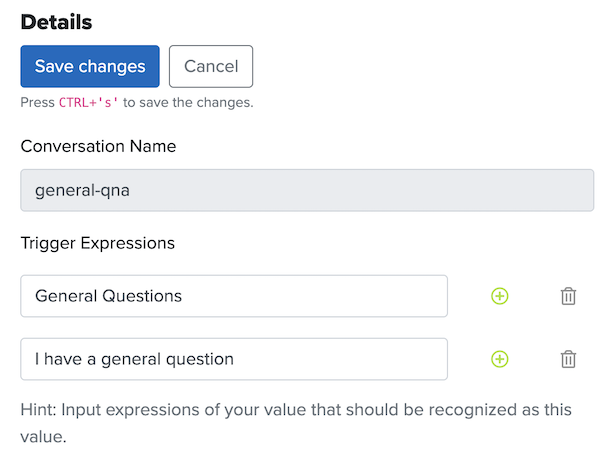
Trigger Expressions:
- General Questions
- I have a general question
The new trigger should look like this:
Step 3 — Save
Save the new trigger by pressing the Save changes button.
Step 4 — Test
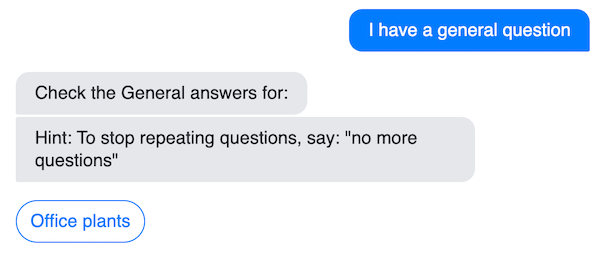
Finally, you should be able to test the new conversation in action, by saying
- I have a general question
Your chatbot should respond with:
Final Word
Congratulations! 🎉🥳
You have just updated your chatbot to display the questions in categories that are relevant to you. Additionally, you have added a helper conversation that displays a list of questions for your new category. This will help your employees find the questions and answers they need.
Publishing
To make this chatbot available to your employees, you will need to get it published in your internal website. Here is our documentation on Publishing to Web.
Learn More
If you missed the first part of this series, be sure to check it out here. Or if you're curious for more about how to build chatbots using NativeChat, check out our developer tutorial.

Sebastian Witalec
Sebastian Witalec is a Senior Developer Advocate for Progress who specializes in Angular and NativeScript. He loves working on both serious and fun projects and one day he will use his robot army to conquer the world.
Comments
Topics
- Application Development
- Mobility
- Digital Experience
- Company and Community
- Data Platform
- Security and Compliance
- Infrastructure Management
Sitefinity Training and Certification Now Available.
Let our experts teach you how to use Sitefinity's best-in-class features to deliver compelling digital experiences.
Learn MoreMore From Progress
Latest Stories
in Your Inbox
Subscribe to get all the news, info and tutorials you need to build better business apps and sites
Progress collects the Personal Information set out in our Privacy Policy and the Supplemental Privacy notice for residents of California and other US States and uses it for the purposes stated in that policy.
You can also ask us not to share your Personal Information to third parties here: Do Not Sell or Share My Info
We see that you have already chosen to receive marketing materials from us. If you wish to change this at any time you may do so by clicking here.
Thank you for your continued interest in Progress. Based on either your previous activity on our websites or our ongoing relationship, we will keep you updated on our products, solutions, services, company news and events. If you decide that you want to be removed from our mailing lists at any time, you can change your contact preferences by clicking here.
